Tuesday, September 26, 2017

LMS Login

The LMS login process is the same for all users with registered accounts.

How to log into your LMS account

When accessing the LMS login page, use the Sign In button in the upper right corner to enter:

The Sign In button will then redirect you to the login page, where the system will ask you for your credentials (email and password):

How to recover your password

If you enter incorrect credentials, the system will alert you that it cannot find the credentials you are using. If you believe that you have made a mistake, you can try again with the correct email address and password. In case you have forgotten your password, you can use the Forgotten password link to try and recover it.
If you follow the Forgotten password option, the system will require your registered email address.

After that, a confirmation in the upper left corner will let you know that the system has sent you an email with a link. Check your email to find the link.

E-mail that you will receive content a link for reset the password with a new one.
Type in your new password, confirm it and press the SAVE button. Then try to log in again.

Monday, September 25, 2017

Archives menu


The Archives menu gives you the option to keep track of active and inactive (closed) rooms on your account.
To access the archives menu, click on Archives in the left-side menu
A new window will open.
Here you can see the title of the sessions, as well as the date and time when they took place. In order to see further details regarding a particular session click on the title of the room, e.g. Room 20693.
By clicking on Play Recording you will be able to watch the recording of the session. Recordings are available from both your point of view and that of the participants.

Sunday, September 24, 2017

Upgrade and Update

The Upgrade and Update menus in your virtual classroom account allow you to purchase a subscription and update it, respectively.

How to Upgrade to the Premium Virtual Classroom subscription

In order to upgrade your Free Virtual Classroom to Premium, log in to your account and click on Upgrade in the right corner of the screen.
upgrade plan

Once you click on Upgrade you will redirected to the following page, where you will be prompted to enter your billing information. Additionally, you will be able to see details about your purchase and the current subscription plan. To proceed further click on Complete Purchase.
Once clicked, a new window will open. You have to enter your billing information there. Enter your details:
  • First and Last name
  • Email address;
  • Country of Residence;
  • Address;
  • Zip Code;
  • Phone number.
Then enter your payment method details:
  • Cardholder name;
  • Card number;
  • Month and Year of expiry;
  • CCV2.
Click Complete Purchase to complete the purchase.
You will get to the next step, where you will need to add your details and select your preferred payment method (Credit and Debit cards, such as Visa, Mastercard, etc.). Once done click on Continue to confirm and finish your purchase.
After the payment goes through you will see a window which will allow you to go straight to your Dashboard or download the invoice for the purchase.
Additionally you will receive an email from no-reply@vedamo.com containing the purchase information, date of payment and the date your next payment will take place.

How to Update your Premium Virtual Classroom subscription

To update your Premium Virtual Classroom click on Billing and Upgrade.
A new window will open which contains Subscription and Billing details.
You will see information regarding your preferred payment method, the option to update the storage used for the virtual archives, templates and files. You can also cancel your subscription through this menu.
Drag the slider to adjust the amount of extra storage you are going to need.
Once done click on Update. That will open a new window which will require you to add your details and select your payment method. Put in the necessary information and click on Continue to confirm and finish your purchase.
After the payment goes through you will see the below window which will allow you to go straight to your Dashboard or download the invoice for the purchase.
Additionally you will receive an email from no-reply@vedamo.com containing the purchase information, date of payment and the date your next payment will take place.

How to Cancel your Premium Virtual Classroom subscription

To cancel your subscription click on Cancel Subscription.
Once clicked, a new window will appear which will prompt you to confirm if you want to cancel your subscription. Canceling your subscription means that you will no longer be charged automatically once your subscription period ends. You will need to make another payment manually in order to renew your subscription.
Click Close to close the window without making any changes or Cancel Subscription to cancel your subscription.

Friday, September 22, 2017

So, What is Vedamo?

E-LEARNING IS EASY

VEDAMO is an easy-to-use web-based solution for creating and managing self-paced learning, live online sessions, and face-to-face training in one platform, Created by tutors for tutors, Adjustable to all types of educational providers and services.

Virtual Classroom

A video-conferencing tool for teachers who want to conduct interactive live online sessions

Key functionalities:

·         Video-conference
·         Interactive whiteboard
·         Media player
·         Session templates
·         Breakout rooms
·         Screen-sharing
·         Session archives

 Learning Management System

Flexible solution for managing learners, content, online courses, virtual live sessions, and face-to-face trainings

Key functionalities:

·      Course management
·      Users with different roles
·      Quizzes
·      File library
·         Internal messaging
·         Virtual classrooms management
·         Notifications and reminders
·         Attendance report

VEDAMO Virtual Classroom and Learning Management System provide you with all the functionalities you need to run your own online academy.
In addition to the technical support, VEDAMO team also provides teacher training and consultations to key customers.

VEDAMO is used by:

·         Universities
·         Schools
·         Kindergartens

·         Individual tutors
·         Small teaching organisations
·         Corporations

Request your free live demo today!

Contacts:


h@vedamo.me
+971 503 199 496
vedamo.me
Facebook/vedamome

Tuesday, September 19, 2017

System Check


Description

The system check is a function of the virtual classroom, which allows you to test whether your software and hardware meet the virtual classroom’s technical requirements.
The system check contains 7 steps:
The final step is a confirmation that you’ve completed the check successfully . In case you experience any issues during the check, there are articles you can refer to by clicking on the name of the step above (except the connection speed check, as the instructions for that are the same as for the second step – connectivity check). The system check itself also contains links to the video tutorials and instructions included in the articles.

System check – in the room

Prior to entering the room, the platform will run a system check in order to determine whether your hardware and software meet the virtual classroom’s technical requirements. The system check runs every time you access the classroom.
If you encounter any issues during the check there are instructions and video tutorials on each steps that you can use in order to resolve the issues.

High video quality is on by default. In case you encounter any problems with your connection, you should switch video quality to “low” to improve connectivity.


During the microphone check, please talk into the microphone. You will be asked to confirm if you can hear the recording.


After successfully completing the system check you will enter the virtual room.


System check – outside the room

As a tutor, you can also access the system check outside the room. You can access it through the navigation window, by clicking check your system.

Alternatively, you can click the Check your system button on your dashboard.


The system check outside the room would be useful to do an hour or so before your first live lesson with students or if you have made any software or hardware changes. This will give you enough time to contact our support team should you encounter any issues.

When you are ready to start the check, press Start.
The process is identical to the system check within the room. You will have access to helpful instructions and video tutorials in case you encounter any issues. Once again, please talk into the microphone during that specific step. You will be asked to confirm if you can hear the recording.
After all steps have finished successfully, you will gain access to the room.


Now that you are in the room, you might be interested to find out more about the tools you have at your disposal in it.

Monday, September 18, 2017

One-on-one vs. Group Virtual Teaching

One-on-one working sessions presuppose the use of specific approaches and strategies to a great degree different from the ones in group work. The learning process is highly personalised and is subordinate to the interests, difficulties and tempo at which the learner progresses. The tutor guides the learning process by taking a full account of the learner’s individual characteristics.
In order for the student to be able to acquire the study content it has to sufficiently adequate to their needs and interests and at the same time sufficiently varied and interactive so as to compensate for the lack of interaction with the other students. One of the main advantages of the VEDAMO Virtual Classroom is that it provides a sufficient number of tools and possibilities for this condition to be fulfilled.
The one-on-one working format requires a higher concentration in the interaction both on the part of the learner and the tutor. This leads to a higher degree of responsibility for the learning process on both sides.
At a first glance, it might seem that when working one-on-one the tutor needs a much less amount of preliminary preparation than when working with groups – it is not necessary to develop adapted materials to meet the different learning styles in the group, there is no need to manage the group interaction, the learning process is personalised by default, etc. Such statements are rather misleading.
In the one-on-one form of learning the tutor must be well-acquainted with the strong and the weak points of their learner. Before the course begins, it is advisable that a learning style test and a current knowledge proficiency test are administered to the student.  These would help the tutor develop the best strategies, approaches and study materials for the specific learner which would take about the same time as for the group-work format. The Virtual Classroom enables the learner needs diagnostics to happen effortlessly and in the course of the working process (instead of just pre-testing it). In the course of work the tutor can differentiate and dynamically reorder the study content in accordance with the demonstrated in the learning process strong and weak learner points.  
In the one-on-one work format there is also interaction management be it slightly more different than the in-group one. The one-on-one learning process requires an extraordinary amount of flexibility from the teacher. Due to the requirement for strict planning of the study process in accordance with the specific learner needs it is hard to follow a pre-developed formal curriculum. The tutor needs to consider the learner’s individual learning tempo and be ready to change the planned activities and content according to the specific situation.
In the one-on-one work format tutors almost always have to adapt the study materials according to the specific learner but they also can use resources recommended or developed by the learners themselves.
One-on-one lessons frequently take place with a tempo dictated by the student and their needs and not according to a pre-planned and officially regulated framework or structure. There is flexibility in terms of each session’s duration based on the specific educational aims and not on a pre-planned formal curriculum.
Although almost all techniques applied in group learning are applicable in one-on-one learning, the way and the reason for their application change. For example, in language learning it may be the case that the longer reading comprehension and listening comprehension activities break the lesson time balance and have to be adapted. Other techniques happen to be more suitable for one-on-one lessons, like for example reading aloud longer texts.
VEDAMO offers the full set of tools necessary to the tutor for the implementation of effective one-on-one work. Blending synchronous sessions in VEDAMO Virtual Classroom with asynchronous self-paced learning in VEDAMO Learning Management System allows learning to be additionally personalised – the student is able to learn at a convenient time and suitable tempo while they take part in learning from the comfort of their home setting.
The main advantages and disadvantages of the one-on-one format of learning can be summarised as follows in the table below:
Advantages                             Disadvantages
  • The tutor’s full attention is directed at the specific student. This implies more opportunities for direct communication, more and more personalised  feedback, a better understanding of learner needs.  The specific learner’s needs are taken into consideration when setting educational aims, determining the learning tempo, and personalising the study materials.
  • The learner has at their disposal a lot more opportunities for using the teacher as a resource – ask them questions, practice skills they find important, etc.
  • The tutor is free from the many challenges of group work – different levels, group dynamics, absent students, etc.
  • No possibility for in-group support.
  • Sessions can be exhausting, both for the learner and the tutor due to the higher concentration in interaction.
  • The tutor may feel pressed in results accomplishment due to the higher degree of responsibility.
  • The tutor may encounter difficulties in the structuring of an effective learning curriculum.
  • It might be difficult for the tutor to measure learners’ progress without a preliminary framework of reference and the possibility of comparing their results with the rest of the group’s results.
Here are some recommendations for organising one-on-one work format in VEDAMO e-learning platform:
  • Discuss with your student their needs and expectations. It is especially important to know what your learner wants to achieve within the course as a whole and in each particular session in specific. Negotiate the main priorities.
  • In case that during the course their needs change, discuss their priorities again. Thus, you are able to allot the necessary time to catch up with any omissions in knowledge and compensate weak points in each learner’s preparation.
  • Explain to your student what you are doing and why. Share with them the goals you set and how your work contributes to their accomplishment. Encourage learner questions.
  • Be extremely flexible. In the one-on-one work format you have to be extremely flexible when it comes to session times and duration as well as with the course’s aims and materials. Be ready for changes at a learner’s request.
  • Try applying different methods and techniques. Many of the group-work educational methods and techniques can be adapted and applied in the one-on-one learning (discussions, brainstorming, role plays and simulations among others). Part of them, however, will require your active participation in terms of the performance of the educational activities. Set clear limits. The one-on-one format can lead to infringement of your personal space. From the very beginning you have to decide the extent to which you would allow the student in it. Humanisation of learning may be productive but the invasion into the personal space of the other may be a source of inconvenience both for you and your student.
  • Offer and require regular and constructive feedback. Experiment with different ways of providing feedback.
  • Assign homework and provide additional self-study resources on VEDAMO LMS. Homework has added value in the learning process. Use homework as a means for your learner to cover the activities that there is not enough time for during the synchronous session in VEDAMO Virtual Classroom. Assign tasks based on in-depth new information comprehension and exploration and practice of specific aspects of the study content.   Make sure the self-study topics are interesting for the student so that they are motivated to accomplish them. Maintain a level slightly lower than that of your student. Without the dynamics of group work you may get misled and resort to activities which are easy-for-your-learner and which do not contribute to their progress. In view of building new knowledge and skills you need to offer a gradual complication of the study material and a possibility for overcoming challenges.

Sunday, September 17, 2017

Groups (Breakout rooms)


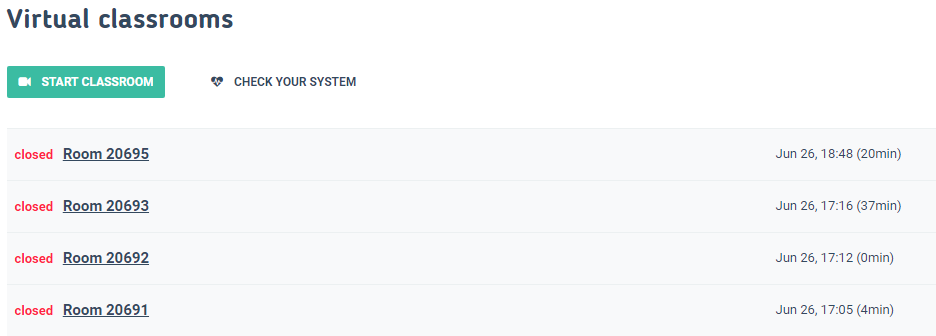
The Groups functionality is a feature of the virtual classroom which allows you to divide any number of participants in your session into smaller teams. Whether you need to give your students an individual exam or have them work on a group assignment, this functionality affords you the possibility to create and customise a separate space for that purpose.
Manage Groups
Groups (also known as breakout rooms) are separate work spaces in the room. Each one has its own separateroom elements: video conference connection, whiteboard, chat, media player, participant controls – available only for the participants added to the group.
The default group in the room is the Main Group – all participants are automatically added to it.
Only tutors can create new groups and manage the participants in them.
Create a group 
In order to create a new group, go to the top left corner and press on the    button which will open a new box with a field designated to specify the group’s name:

Then type group name, chose the participants you want to add in the group and click Create workspace.
If you want you can add a participant in this group straight away by clicking on their name which will move the slider to the right:

In this example: a new workspace is created with one participant (Vedamo User) added to the group, while the other one (Vedamo User 2) is not added to the group.


Press on ‘Create workspace’ to create the group.
NOTE: You can create empty groups and add the participants later To do this, simply put in a workspace name, set all participants to not be part of the group (similar to Vedamo User 2 in the previous example) and then enter the group. Adding additional participants to the group can be done afterwards and the method of doing that is explained below.

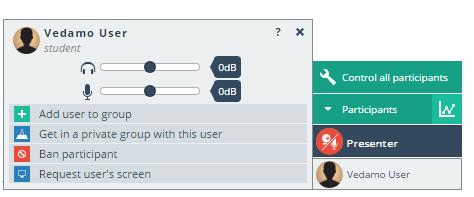
A private group can also be created by using the Get in a private group option from the Participants’ list or the Control all users menu, which looks like this:
Private groups include the tutor and only one other participant. This is a useful feature if you want to give an individual exam to a particular student.
Switch Groups
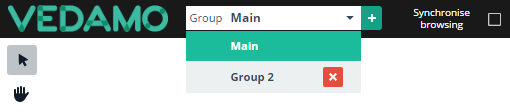
Switching Groups is easy – just select the group you wish to go to from the Groups drop-down list.

By default the first group is the Main group. It is created when the room is started.
NOTE: The Main group cannot be renamed or deleted.
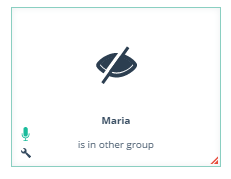
There is a visual indication showing the tutor and other participants that you have switched group. Your video feed changes as follows:


NOTE: The tutor/administrator can call a participant to the group.


Whiteboard in groups 
Every group has a separate whiteboard and the content on it is visible only for the participants who are in that group.
NOTE: If you delete the Group all its content will be lost.

Copy content from one group to another 
Select the elements you wish to share in the other group and Copy them.
Then switch to the destined Group and Right-Click -> Paste in Place
NOTE: Participants can copy or move only their own elements unless they have the permission to Edit All Elements. When granted this permission, they can copy/move any element on the whiteboard.

Chat in Groups
Every group has its own chat and the content on it is visible only for the participants who are in that group.
NOTE: Participants can read messages in the Group chat only while they are in that group.

Video conference connection in groups 
When you switch to another group only the people who are currently in the same group can hear and see you.
NOTE:  You can add participants to this group, but they should switch/come to it in order to hear or see you

Permissions and controls in groups 
Every group has its own permissions.
NOTE: Some permissions are Global and some are for the Group only.

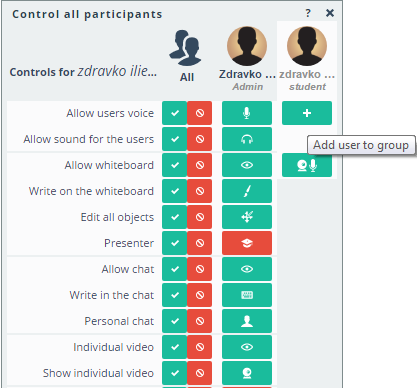
Add a participants to the group
First of all, Enter the Group.
Then, there are 2 ways to add a participant to this group: either by using the Control all Participants or through the Participants list. Both ways are described in the next examples.
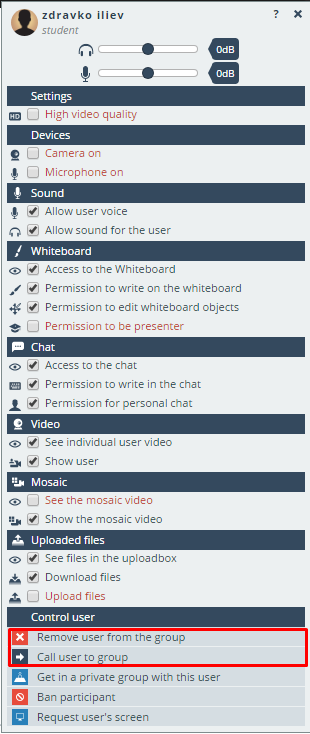
Use Control all Participants to add a participant
NOTE: You do not have a full list of controls for participants who are not in this group. Once you add them their controls will appear.
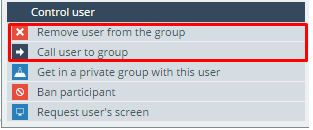
Additionally, two new controls will appear – Remove from group and Call user into the group.

Use Participants list to add a participant

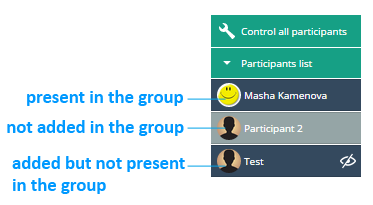
NOTE: The participants who are not added to this group do not have controls. Once you add them their controls will appear.


Click on the name of the participant in grey to open their personal controls and Add user to group


Call Participant to the Group
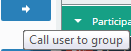
Use Control all Participants to call a participant
Open the Control all Participants and click on the  button towards the bottom.
Use Participants list to call a participant
Open the Participants list, select the participant you wish to call and click on
NOTE: You should add the participant to the group first.

Remove Participants from the Group
You can remove a participant from the group and add back at any time.
Use Control all Participants to remove a participant from the group
Open the Control all Participants and click on remove  button towards the bottom.
Use Participants list to remove a participant
Open the Participants list, click on the name of the participant you wish to remove, then click on
NOTE: The tutor cannot be removed.

Delete a Group
You can delete any group, except for the Main one, including all their content and settings.
NOTE: Once you delete a group, you cannot restore it.
To delete a group, open the Groups drop-down menu, then click on the  button next to the group name.
Next up, we’ll take a look at the Synchronise browsing option, which, as the name suggests, allows you to synchronise your view with that of your students during the lesson.